Hello Everyone, In this tutorial we are going to cover the topic related to Hacking which is Reconnaissance means Gathering Information.The first and base step needed to hack our desire system.


First of Things you are going to need:

Kali Linux
 Nmap
Nmap
install kali Linux either as an complete Operating System or in a Virtual Machine.
After installing nmap will be provided right out of the box on kali.
To see tutorials on How to install Kali Linux click here
So Lets Begin:
Fire up the Kali Linux:
Step 1:Open Nmap in Kali:
Open Terminal in kali linux located at the left and residing in the dock of Kali linux:
TYPE: kali>nmap
and hit enter.
The Terminal on Kali display a list of useful information on the screen like:

As you can see the nmap is displaying useful information about SCAN TECHNIQUES.
Let us see an example:
If we want to identify TCP ports that are open on our target machine we need to write the following syntax:
nmap <scantype> IP address
like below:

Step 2: Get Started with Some Basic Tools:
a)Operating System Detection Scan:
The Operating System helps the attacker to know the knowledge about the victim operating system.
In order to do this we need to write the following syntax:
nmap -O VICTIM-IP
Like given below:

b)TCP SYN Scan:
The benefit of TCP SYN scan that it allows the hacker to gather the infromation without completing the TCP handshake process about the ports that are open.
You need to write the following Syntax:
nmap -sS VICTIM-IP
Like that below:

c) ASK Scan:
This scan helps to determine the ports that are open or as filtered.It is also used to map out firewall rule set.
Syntax:
nmap -sA VICTIM-IP

d) Ping Scan
This scan helps the hacker to identify which host is live for target.
Syntax:
nmap -sP VICTIM-IP

e) Scan for Ports:
First we will going to to perform the action using -sT scan.This will allow the hackers to scan all the ports.
Syntax:
namp -sT VICTIM-IP
Like below:

But the downside is that it will create files like like Logs which will definitely helps the security team to trace us back.
So in order to avoid this we need to -sS scan since it does not require handshaking so no logs is being generated.Like we have done above at the TCP SYN scan.see Section 2.b also:
Sample:

STEP 3: Scanning for a Specific Port or Port Range:
Sometimes we are looking to spoof inside a specific port range in that case nmap tool will help us to determine and overcome the situation by simple writing the following syntax:
nmap VICTIM-IP -p"port-start"-"port-range
Like below:

As we see in the highlighted form that,it scan for the port that have being listed above.
STEP 4: Scanning a Subnet:
Sometimes we want to scan more than a single IP address.Nmap allows us to use CIDR notation to deignate an entire subnet at a specific port.
Syntax:
namp VICTIM-IP/24 -p80
Like Below:

STEP 5: Spoofing and Decoy Scan:
When we are scanning machines that does not belong to ours then we really need to hide our IP so to avoid being traced back.
A better approach to do this is to bury our IP address among many IP addresses so that the network as well as the security officials do not traced back at us.
In order to do this we need to write the following syntax in the nmap.
Syntax:
namp -sS VICTIM-IP -D 10.0.0.1,10.0.0.2,10.0.0.4
Like below:

In the above sample the scan uses 3 IP addresses along with our original one so when the System Admin sees scan that it will be coming from the 4 different systems simultaneously so He find quite difficult to pinpoint the original source from where the attack is generated.
STEP 6: Evading Firewalls:
Many firewalls and routers block or drop the ICMP(echo request, echo reply) ping.This is meant to obscure the presence of the hosts behind the firewall and protect against a possible DoS using the ping packet.
To get around the firewalls and routers that block or drop the ping,we need to write the following Syntax:
nmap -sS -P0 VICTIM-IP
Like Below:

STEP 7: Gathering Version Information:
When nmap runs a port scan,It retrieves the port info (open/closed/filtered) and then gives us the default service that is running on that port,As one can run any service on that port , that may not be adequate information.
Nmap has the feature that interrogates the service running on each on port scanned.
Syntax:
nmap -V VICTIM-IP
Like Below:

STEP 8: UDP Scan:
Some of the Servies and ports use UDP to communicate with the world outside.Our Previous scan was on TCP ports, so in order to do this we need to write the following Syntax:
nmap -sU VICTIM-IP
Like Below:


In the above Screenshots there where two targeted system in order to understand it more clear.
And clear from above UDP reveals ports and services that are not found by the TCP scans.
STEP 9: Reason
Note in the above Screenshots the UDP scan some of the ports and reported us as open|Filtered, which means that nmap cannot determine whether the port is open or filtered.
So we are going to scan the Reason scan so that nmap place the particular port in the particular state
In order to do this we need to write the following syntax:
nmap -sU --reason VICTIM-IP
Like Below:

As in the above screenshot it is clear that the port is open|Filtered and it received "no-response".
STEP 10: Wild Card Scanning:
Sometimes we want to scan a wide range of IP address, we can simply do this by playing a wild card and writing the following Syntax.
nmap <scantype> 192.168.1.*(keyword)
Shown Below:
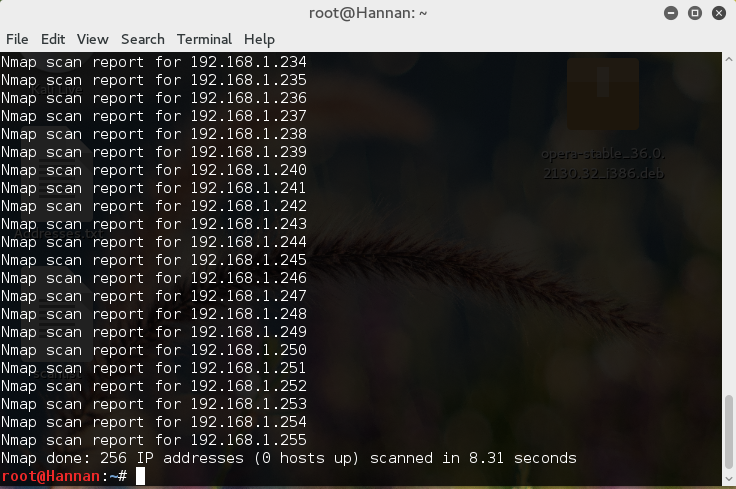
As you can see it scans a wide range of IP addresses.
STEP 11: Using A List:
Many times we want to scan the list of IP addresses we can simple do this by creating a list using text editor Like LeafPod in Kali. and then feeding the file into nmap.
Note: you can change the directory in Terminal by keyword "cd".
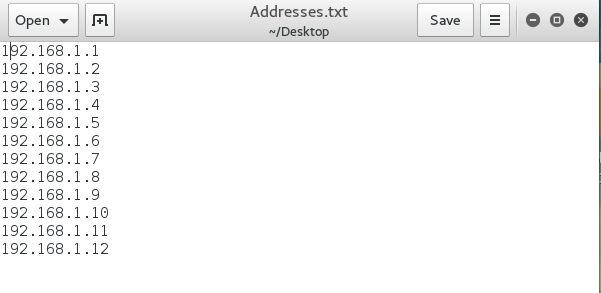
Now You can simple do this by the following Syntax:
nmap -iL <filename.extension>
Like Below:

As clearly see the in the Highlighted area.
STEP 12: Output to a File:
If we are scanning multiple IP addresses, we probably want to save the output to a file for later references.
We can simply do this by typing the following Syntax:
nmap -sS VICTIM-IP -oN portscan
Like Below:

It creates a file in the default directory Like shown Below in the highlighted portion contain all the information:

If we want to read from the file we are going to type the following Syntax in nmap:
cat portscan.txt
_______________________________X_______________________________
NMAP IS ONE OF THE MOST POWERFUL AND HELPFUL IN TERMS OF A HACKER, IT SHOULD BE MASTERED BY EVERYPERSON TO BE PROFICIENT AT THIS TRADE
SO TODAY WE LEARN A LOT OF STUFF ABOUT NMAP'S SO DONT WORRY IF U FIND IT DIFFICULT JUST KEEP PRACTICING BECAUSE IT IS WELL SAID:
"PRACTICE MAKES A MAN PERFECT"